
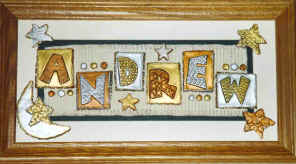
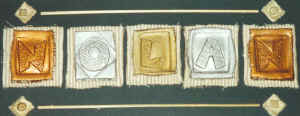
Nifty Name Plaques
Designer - Sandie Wiese
Materials:
- Creative Paperclay® modeling material
- Rubber Stampede® "abc zone Pattern Alphabet" rubber stamps
- DecoArt® Dazzling Metallics Paints: Glorious Gold, Shimmering Silver, Bronze
- Fabric (woven placemat fabric with frayed edges used in project shown)
- Matboard(s) and Wooden Frame to fit
- Fiskars Paper Edgers scissors (Deckle edge effect shown)
- Glue Gun and glue sticks
- Acrylic Varnish
- Rolling pin
- Paint brushes
- Non-stick cookie baking sheet
- Oven (optional)
- Cookie cutters (optional)
Procedure:
- Working on a smooth, clean work surface, use rolling pin to evenly flatten large amount of Paperclay® to approximately 1/4" thickness. Rolling the Paperclay® out between two sheets of waxed paper will also work.
- Gently, with evenly distributed pressure, stamp Rubber Stampede® Pattern Alphabet letters individually into the rolled out Paperclay®. Be sure to leave ample space between the stamped letters for cutting out.
- Using Fiskars Paper Edgers (Deckle Edge), cut out each letter and place on non-stick cookie baking sheet.
- Molding by hand, or using shape cookie cutters to cut out, create additional decorative shapes. Place with ready to bake letters.
- Air dry letters and shapes for about 24 hours (changing sides 1/2 way through time), or bake at 250 degrees for approximately 40 minutes, turning pieces over to backsides during the last ten minutes of baking for even drying.
- Use glue to secure matboards to each other, and to attach woven fabric to matboard. Place into frame securely.
- Paint dried or baked letters and shape pieces as desired. When dry, varnish letters and pieces with acrylic varnish.
- Attach dry, varnished pieces using a glue gun, to material and matboard as shown or desired.