
Seal of Delight™
Designer - Stacey Morgan, SCD
*Note that colored clay can be made by mixing acrylic paint into white Delight™ or by using colored Delight. (available in stores soon)
How-To:
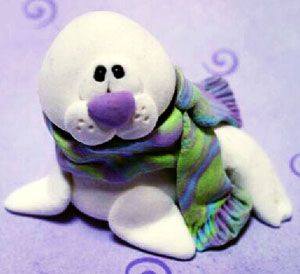
Body - Form a teardrop shape with the white clay. Lay it on its side and cut the point with scissors or a knife only about a 1/16”. Bend towards the front a little.
Flippers - Each flipper is a small flattened teardrop pressed onto the front of the body.
Head - Insert a toothpick halfway into the top of the body (widest end of the teardrop). Add a dab of glue to the end of the toothpick. Roll a white ball of clay and press it onto the toothpick.
Face - Each eye is a small flattened teardrop of white clay pressed onto the face. In the top center of each eye, press a black bead. The snout is made from two small balls of white clay pressed on the face below the eyes. The nose is a small lavender ball of clay pinched on one end and pressed on top of the two white balls, and just below the eyes. Use a needle tool or toothpick to indent three dots on each side of his snout.
Scarf - The scarf is easily made by twisting three colors together (light blue, light green and lavender were used here). Flatten the rope of clay and use a needle tool or toothpick to indent fringes at each end. Wrap around the seals neck and arrange.
Allow to dry overnight.
Add light pink blush/chalk to his cheeks.