Color My World AccessoriesThese great accessories may look complicated, but even a beginner can create them using new pre-colored Delight™ modeling clay and original white Delight™. Try out the multi-color "Skinner Blend" technique below (discovered by Judith Skinner) and in no time you'll be crafting your own gorgeous barrettes, pens, unique trinket boxes and much more!
Designer - Shirley Rufener, CPDSupplies:
Delight™ air dry modeling compound (Red, Blue, Yellow & White)
Shade-Tex® Cultural Pattern plastic rubbing plate
Small paper mache box with lid, barrette clip and ink pen
Aleene's® Platinum Bond 7800 all-purpose clear adhesive
Aleene's® All-Purpose White Glue
Hand crank pasta machine (dedicated to craft use)
Baby powder or cornstarch
Large ziploc type bag
Craft knife (or kitchen paring knife)
Large soft bristle paintbrush
How-To:
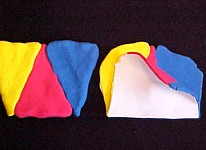
1. Shape 1/4 package of yellow clay into an isosceles triangle (tall triangle) that is 1/4" thick. Repeat to make a red and a blue triangle and secure together as shown. (Note: If you want green in your blend, position the yellow in the center.)
2. Roll 1/8 package of white clay through pasta machine at setting #1 to form a sheet, and secure to triangle assemblage. (White clay brightens the colors in the blend.)
3. Roll clay thru at pasta setting #1.
4. Fold the bottom half of sheet up to the top edge and press together. Place folded end into machine and roll at setting #1.
5. Repeat step 4 (always folding bottom edge to top edge on same side of clay) about 25-30 more times until colors are smoothly blended. (Colors will look distorted for a while, keep rolling!)
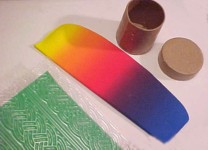
6. Roll sheet once through machine at setting #2 so you have a long piece of blended clay.
7. Dust texture plate with baby powder and press clay over desired area. Run the plastic plate with clay attached through machine at #1 setting.
8. Carefully lift clay without stretching it, and gently brush away any excess powder with slightly moist paintbrush. Slide clay sheet into a plastic ziploc bag to prevent drying.
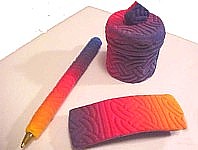
9. Place lid on mache box, and apply a thin layer of white glue to outside and top of box, and to plastic area of pen. Let dry 1 minute only so glue is still tacky.
Covering Box and Ink Pen:
1. Cut a section of textured clay to fit around box and pen, and wrap around item to cover it (keeping lid on box!) Allow edges to just meet (do not overlap) and cut away excess clay.
2. Cover top of box lid with a circle of clay cut to lid diameter and smooth clay seam. Make a slit around box just below lid's bottom edge so box will open.
3. Cut a small handle and glue in center of lid. Allow to dry completely. Option: You may wish to paint areas (under the lid rim, box bottom and inside) later for a finished look using acrylic paint.
Barrette
1. Secure a 1/8" thick layer of scrap clay to the back of textured clay for stability. Cut a strip of textured clay that is 1/2" longer than barrette clip by 1" wide.
2. Smooth corners to round them slightly and drape clay sheet over barrette clip to dry with the same curve.
3. Secure barrette clip to back of clay with 7800 adhesive and allow to dry overnight.