Fat Cat Ornament
by Shirley Rufener, CPD
Shirley's website: www.shirleyrufener.com
Materials
- Delight™ air dry modeling compound
- One Styrofoam goose egg (and a Styrofoam scrap)
- Acrylic roller tool or smooth drinking glass
- Kitchen plastic wrap or waxed paper
- Acrylic paints: black, white, leaf green, brick red
- Permapaque fine point paint markers: Yellow, Black and White (Sakura)
- Acrylic paint: white, black, school bus yellow, leaf green, barn red
- White tacky glue
- Pencil
- Flat paintbrushes (1/2" and 1/4" wide)
- Brass large screw eye (used as hooks)
- Clear satin sealer spray (for acrylic paint)
- Thin gold elastic cording
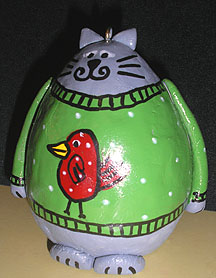
This fat feline makes a great holiday ornament that can be hung on your tree or set on a mantel or shelf. He's warm and cozy in his winter sweater featuring a folk art bird design. He is easily formed over a regular Styrofoam egg that's been sanded on the bottom so he can sit up for the festivities. Of course you can change his sweater design and colors and enjoy him all year long!
Instructions
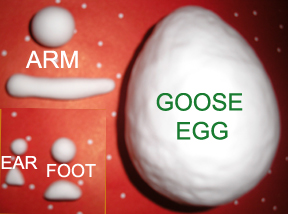
1. Sand off the bottom (fat end) of the egg flat, using another small piece of Styrofoam with a straight edge. Roll out a large sheet of Delight to 1/8" thick on plastic wrap and cover the egg. Smooth any bumps with finger. Form two 3/4" clay balls into tapered ropes as shown for arms, and secure on either side of the egg body with a little tacky glue.
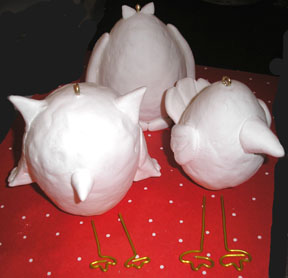
2. Form two pea sized balls for the ears. Shape them into triangles. Secure to head area with tacky glue (see cat project in center of photo). Form two large pea sized clay balls and shape into little half circles as shown (see step1 photo). Secure feet to the body base with glue. Add a little glue to the threaded area of a screw eye and press into the top of the head for a loop. Allow the Delight to dry overnight or longer. The clay will have a little give but will feel dry and very lightweight when ready to paint.
Refer to the finished project photo for the remaining steps:
3. Mix a little black acrylic paint into a good puddle of white paint to create gray. Paint the entire project gray and allow paint to dry. Draw the neckline, bottom edge of the sweater and bottom edge of sleeve with pencil. Paint the sweater area of the cat green and let dry.
4. Pencil in a simple bird on sweater, it's an egg shape body with a beak, and a rounded triangle shape tail. Paint the body and tail red and let dry. Paint a yellow beak with the marker and let dry.
5. Use the white marker to draw two half-circle eyes, and to add randomly placed dots to the sweater and the bird. Use the black marker to draw the vertical lines on the sweater neck, hem and sleeve for ribbing. Draw the cat's face, whiskers, eye pupils, bird details and the paw lines with the black marker.
6. When dry, spray the ornament with sealer and let dry as directed. To make a hanging ornament, thread cording through the loop and tie off at the top. Enjoy!


