Mosaic Picture Box
Designer - Shirley Rufener, CPDYou can turn an ordinary wooden trinket box into an old European style work of art! Simply use the new pre-colored Delight™ clay for ceramic-look tessera (Italian for tiles)...and the grout!
Supplies
Delight™ air dry modeling compound (White, Red, Yellow & Blue)
5" square wooden box with lid (hinged lid optional)
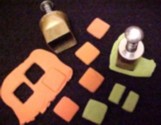
1/2" square Pattern Cutter (see photo below)
Aleene's® Tacky Glue
Aleene's® Paper Glaze
Acrylic roller tool, smooth straight drinking glass or a pasta machine
Craft knife (or kitchen paring knife)
Small flat paintbrush
Large stencil brush (stiff bristles)
How-To:
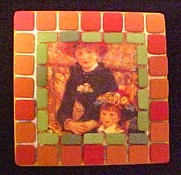
1. Cut a paper image 1" smaller all around than box lid. Apply a thin layer of Tacky glue to box lid surface and press image in center. Gently rub your fingers from center of image outward to press out any air bubbles.
2. Mix Delight™ pre-colored clay into 4-6 hues (colors) that match image. I used shades of rust and leaf green (see recipes on this site under "Spiced Frame" project, then simply add a touch more red to rust, and a touch of white or black to green color mix).
3. Flatten to 1/16" thick sheets with roller (or run through pasta machine at setting #1, then #3).
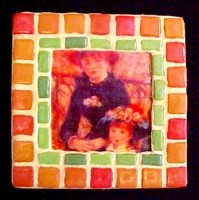
4. Cut enough outer square tiles (rust color) to fit around lid, and half as many inner frame tiles (green) as each green one will be cut in half.
5. Tacky glue should still be somewhat sticky, but if it's completely dry, spread a little glue under tile area. Press rust tiles to lid around outer frame as shown, then fill in inner area with 'half' green tiles. Allow clay to dry.
6. Squeeze glaze onto image then use small curved brush strokes on glaze for a painted effect.
7. Squeeze a layer of glaze onto surface of tiles. Do NOT brush out, allow to remain thick and allow to dry until completely clear (1-2 days usually depending on weather).
8. Mix a 5/8" ball of yellow, 1/4" ball red and a 3/16" of blue Delight™ clay to create a brown mustard color.
9. Pinch off a 1/8" ball of mustard and mix it with a 1 1/2" ball of white Delight™ clay and three drops of water. (Store remaining mustard clay in a ziploc for a future project.)
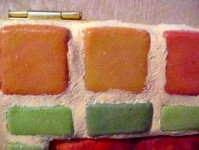
10. While clay is still very moist, roll a 1/2" thick x 2 1/2" long rope of clay to 1/8" thick with roller (or pasta setting #1), and secure over one row of tiles (rust and green). Press into cracks and work clay away from tile surface with moist fingertip. Don't hurry this step.
11. Moisten grout surface once again and pounce stencil brush over grout to texture it, to appear as 'sanded grout'. Allow to dry and enjoy!