Metallic Accent Lightswitch Plates
Designer - Shirley Rufener, CPDThis beginner Delight™ modeling clay project can be created by kids through adults! Just follow the steps below using your existing lightswitch plate cover and our new pre-colored Delight™ clay for a great make-over!
Supplies:
Delight™ air dry modeling compound (Red and Blue)
Shade-Tex® Waves Design plastic rubbing plate
Plastic lightswitch plate cover (save screws for re-mounting cover!)
Gold and silver imitation metallic leaf sheets
Pearl Ex metallic gold and silver powder
Aleene's® All-Purpose White Glue
Acrylic roller tool, smooth straight drinking glass or a pasta machine
Baby powder or cornstarch
Various mini 'star' cookie/pattern cutters
Craft knife or kitchen paring knife (dull table knife for children)
Large soft bristle paintbrush
How-To:
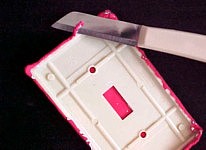
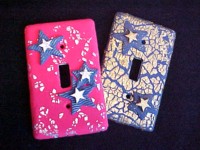
Red Switchplate (scattered metallic accents)
1. Apply a thin layer of glue to switchplate cover and allow to dry until tacky. Form a 1/4" thick square of red clay. Very carefully lay a sheet of silver leaf on clay.
2. Using pressure, roll over clay with roller tool in both directions (or run through pasta machine at setting #1) to severely fracture the leafing sheet, until the clay is less than 1/16" thick (or roll through pasta machine again in a different direction at setting #2, then setting #3).
3. Press clay onto plate cover and remove excess around edge from the back side.
4. Lay plate face down on clean surface and remove clay from center rectangle opening with knife tip.
5. Poke holes at screw positions from the front of plate using an ink pen tip.
6. Dust texture plate with baby powder and press clay onto surface. Run the plastic plate with clay attached through machine at #1 setting or roll with roller.
7. Carefully lift clay without stretching it, and gently brush away any excess powder with slightly moist paintbrush.
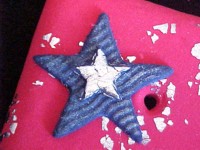
8. Cut textured stars from deep blue clay (see step 2 of Blue Switchplate below) and secure using a thin layer of glue on the back of star. Highlight the raised star texture with Pearl Ex powder on fingertip.
9. Roll a small piece of blue clay till 1/16" thick (pasta setting #3) and apply a thin layer of glue to top surface.
10. Lay leaf sheet over glue, press in place and allow to set for 3 minutes. Cut mini stars and secure to large textured stars with glue. Allow to dry for three days then mount to wall and enjoy!
Blue Switchplate (Evenly fractured metallic accents)
1. Apply a thin layer of glue to switchplate cover and allow to dry until tacky.
2. Form a deep blue color clay by mixing 4 parts blue with one part red. Roll clay to 1/8" thick with roller or pasta machine on setting #1.
3. Very carefully lay a sheet of gold leaf on clay. Roll over clay with roller tool (or run through pasta machine at setting #2) to fracture the leafing sheet on the surface.
4. Follow steps 3 through 10 of red plate above using 'gold' leaf and Pearl Ex powder for accents.